
If you have ever seen a painting of an Indian queen or princess you’d have noticed the colorful costumes and exquisite jewels. That deep love for dressing up in the finest transcends the classes with clear cut definitions of what traditional beauty looks like. Where I grew up, Kerala, the definition of a beautifully dressed women or young lady includes long hair (the longer the better) decked with jasmine flowers, a Bindi, colorful clothes, jewelry in the form of showy earrings, a necklace or two, loads of bangles, and anklets that chime when you walk. All of which I hated to the core. Amongst all these beautifully dressed women I would be this tomboy with short hair (I was big on Princess D’s hairstyle then), no Bindi, pastel colored clothes, a minuscule earring, a very thin strand of a necklace and a bangle (only to appease my mom). Absolutely no anklets, used to complain that they choked my legs (really?)! Now when I think back I used to give my Amma (that’s what I call my mom) such a hard time. As a teenager my interest in clothes took a turn for the better but jewelry was still a big turn off. I was content with a few easy to wear small pieces.
Fast forward a few more years….I turned 30 and did an absolute about face! I had just had my second baby two years earlier so I like to think that the change was brought on by the facts that I crossed 30 plus the realization that I’m a mom of 2 kids. The latter especially took a toll on me; no idea why. I somehow had it in my head that being a mom of 1 was ok but a mom of 2 all of sudden made it sound like I was so much more older. 🙂 Totally dumb thought, blame it on the hormones. Anyways here I was looking at those pretty statement jewelry pieces and wondering, “Hmm… I haven’t worn anything like these in my whole life and if I don’t wear them now when will I wear them? When I’m 60 or 70?” It was as if someone turned on the light in my brain. Really, the next moment onwards I started liking jewelry. All of a sudden those showy earrings that I had always shown a cold shoulder to became my best friends. Now I do have a good collection of jewelry with a good part dedicated to statement jewelry much to the surprise of my mom. She now finds my style a bit too gaudy! 🙂
Interrupting the post a bit to remind y’all about the Front Door paint giveaway. Enter here for a chance to win the most fabulous exterior door paint ever!
**********************************
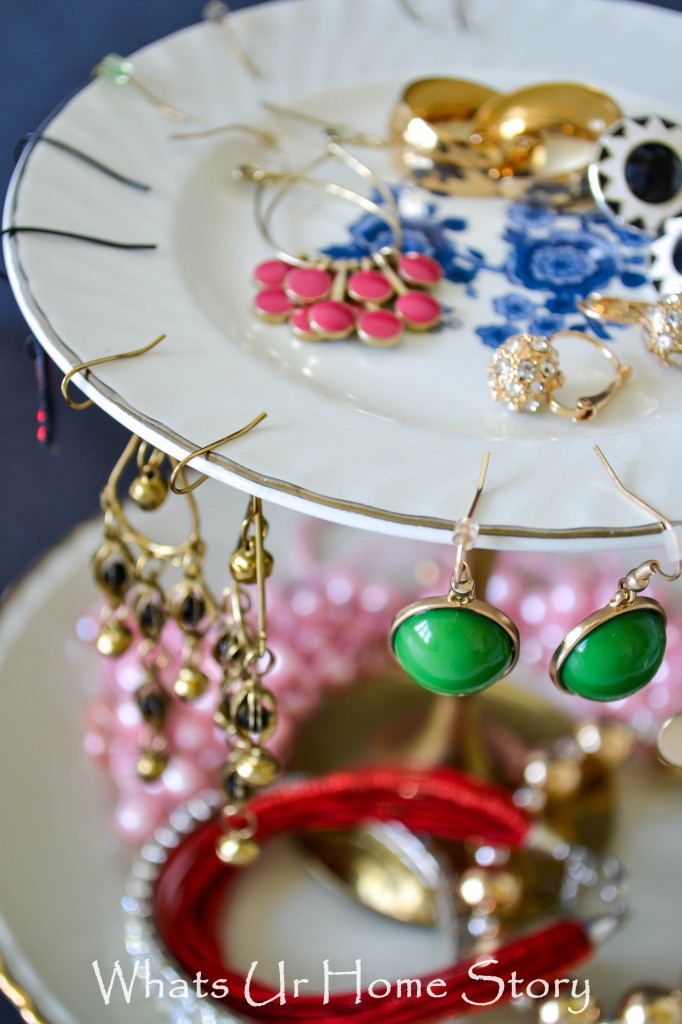
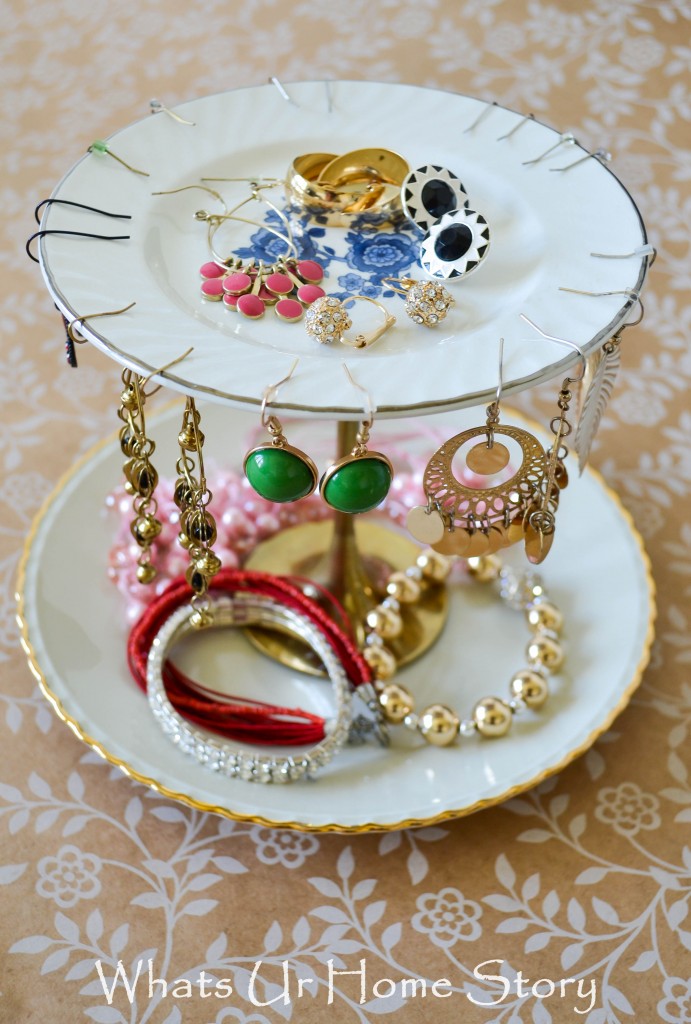
As my collection grew so did my need for storage. A jewelry tree and few drawer organizers were not cutting it, especially for earrings and bracelets. That’s when I came across these at the thrift store.
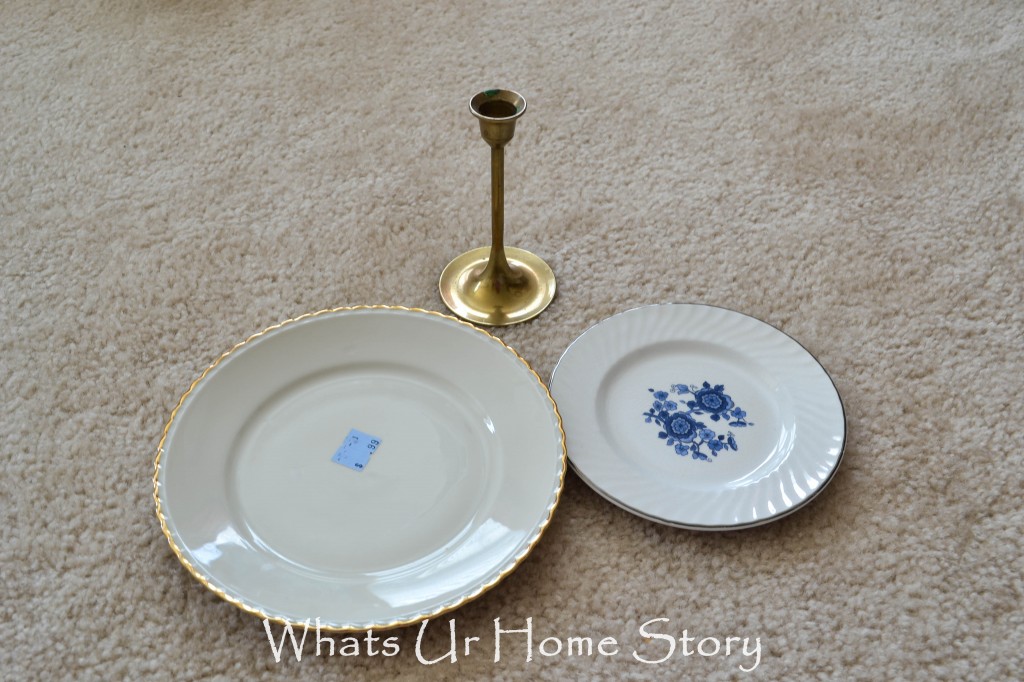
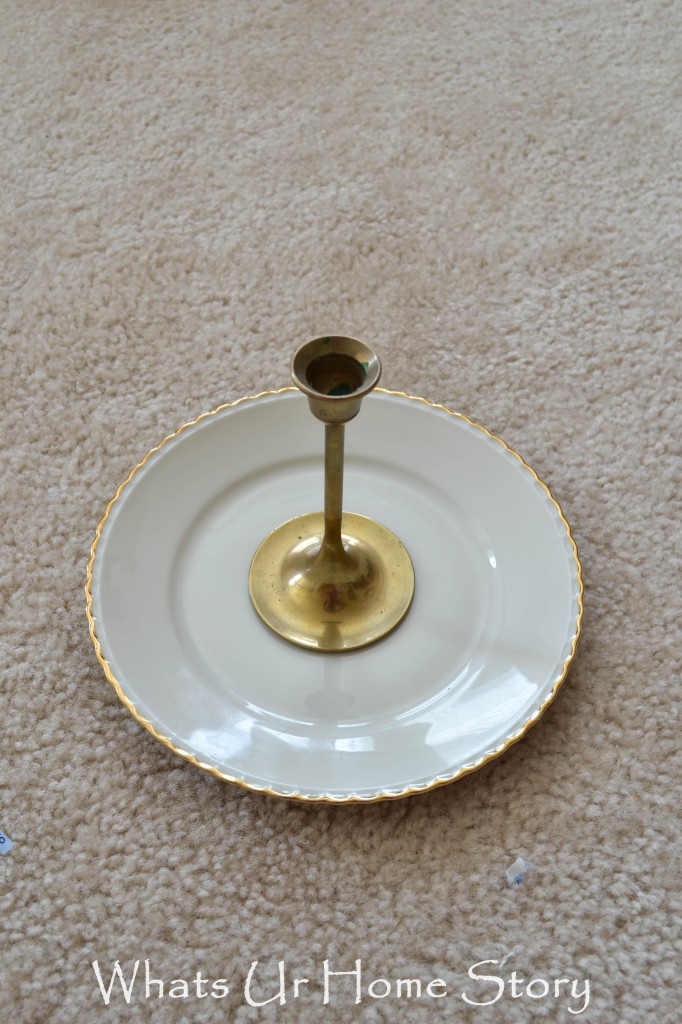
Yes, that pretty tiered jewelry stand started out as 2 plates and a Brass candle stick from the thrift store!
Making this guy is pretty easy. The only hard work is waiting for the glue to dry!
Materials
2 Ceramic plates one smaller than the other Brass Candle Stick Elmer’s ProBond Advanced Glue (I had some left over from my Tile Mirror project)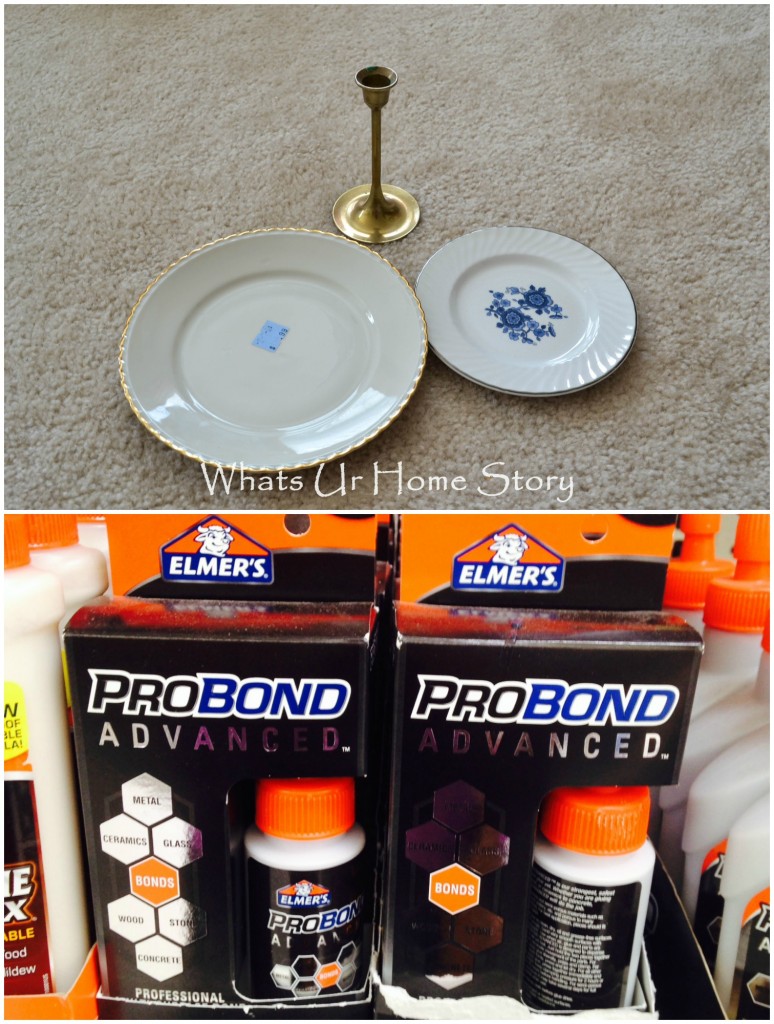
Tutorial
- With a damp paper towel clean the plates off any dust and let dry completely.
- If you prefer the Brass to look shiny you could polish it with Brasso. I liked the tarnished look so used it as is.
- Apply the glue liberally to the base of the candle stick and place it firmly on the center of the bigger plate.
- Weigh the edges of the candle stick down with some books and let it set for 2-3 hrs.
- Now to attach the second plate. Again apply glue liberally to the top edge of the candle stick. Be sure to cover every bit of the rim. Unlike the first plate where most of the flat bottom of the candle stick was glued to the plate here the glued area is going to be just the rim circle. We have to make sure that all of the rim is glued to the plate for a firm stand.
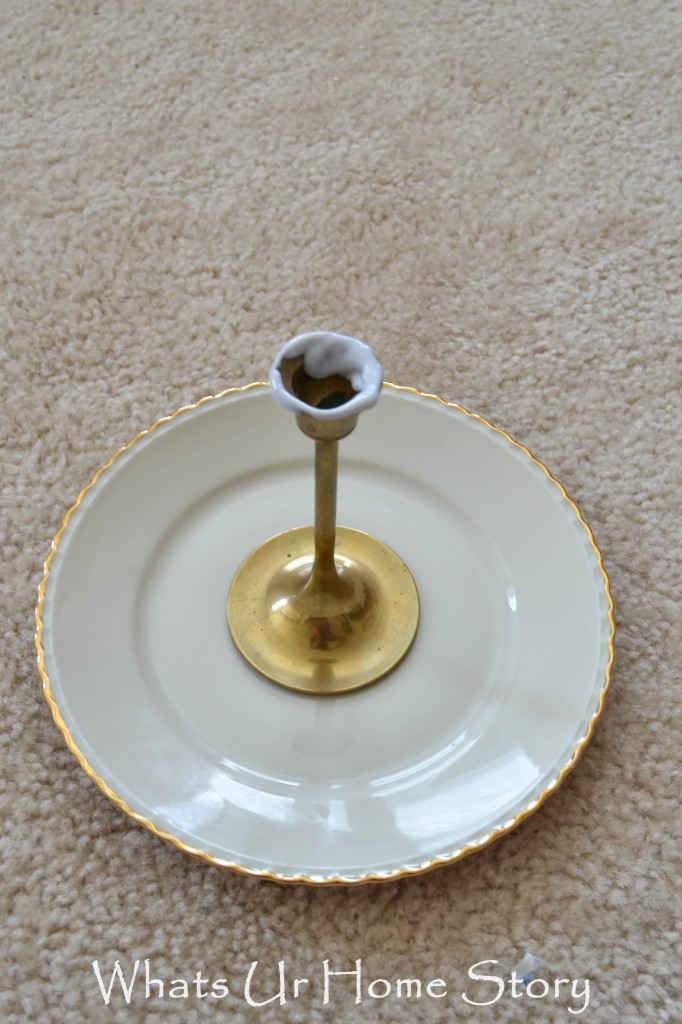
- Place the second smaller plate over the candle stick centering it correctly.

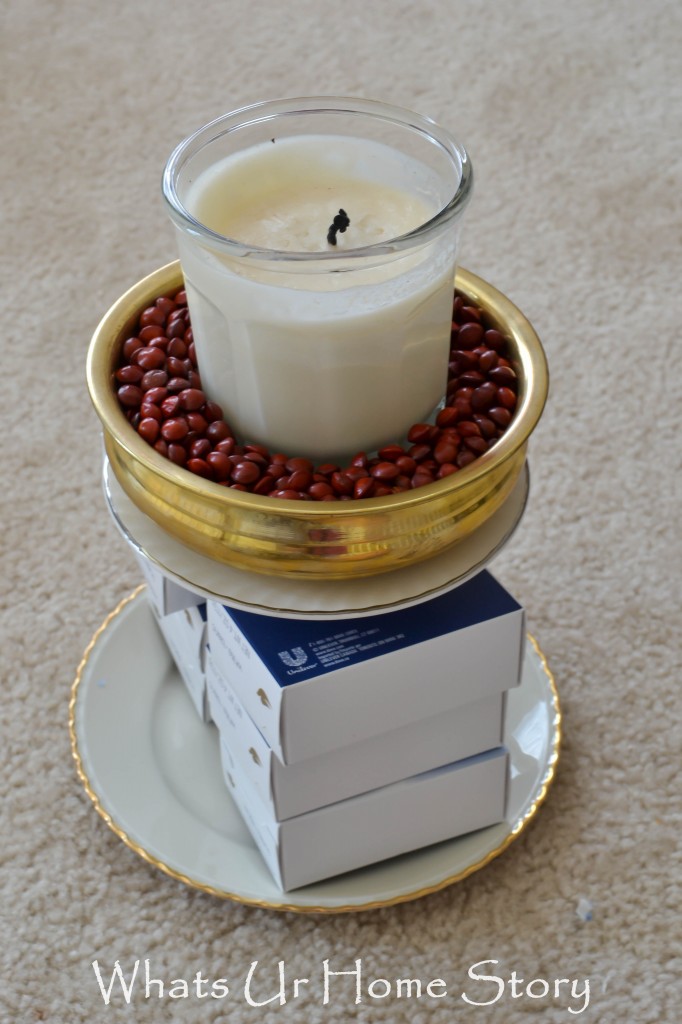
- Weigh it down with whatever you can get. I used soaps on the base, a bowl full of Lucky Red Seeds, even a candle. Could have used some books but didn’t want to the run the risk of tipping the whole thing over.
- Once it sets for 6 -8 hrs and it is ready to use.
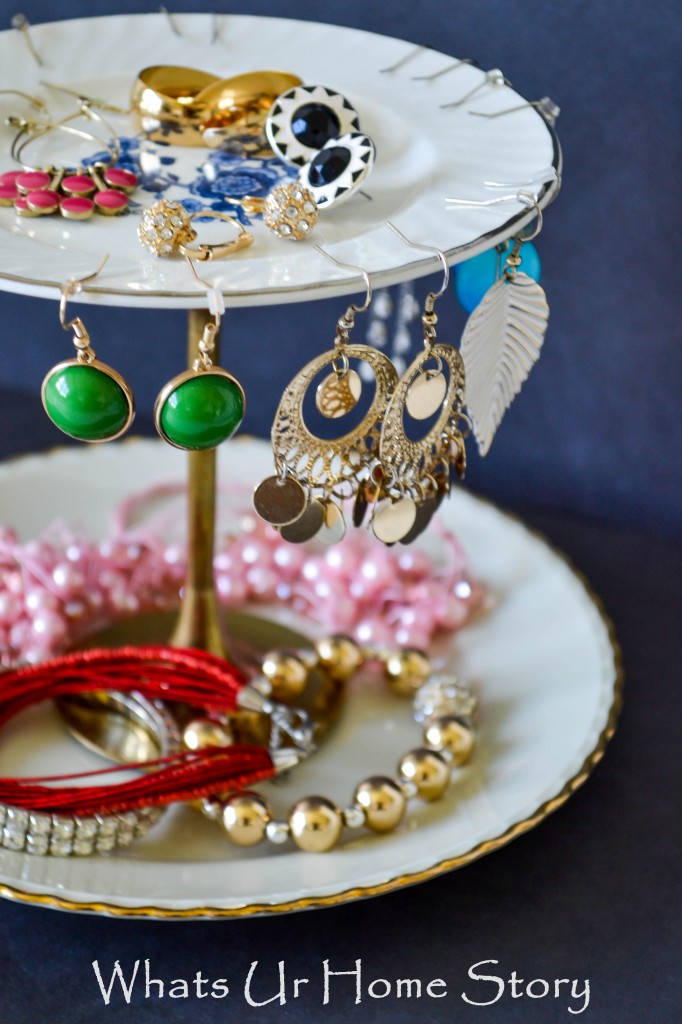
You could add on it by gluing on more tiers or even a bowl to the top.
Do you wear a lot of jewelry? How do you store them? And by the way I still can’t stand the feel of anklets against my skin. Do you like anklets?
You might also like my other jewelry organizer projects; Hanging Wall Jewelry Organizer & Chicken Wire Earring Organizer
PS: Originally conceived for Remodelaholic.


[…] 1. For the love of honey!! (Dedicated to my honey obsessed sister.) Lovely Greens shared how to extract honey from the honeycomb. 2. A beautiful Tiered Jewelry Stand by my friend Vidya from Whats Ur Home Story. […]