
To paint a room with stencil is by no means an afternoon’s task but as you are about to see it is well worth the effort. Fair warning before we head into the post; if you are doing a large room like a dining room it is strongly advised that you spread it over a few days rather than try to knock it off in 11 hours in one stretch.

I got the idea to stencil my dining room walls after seeing Young House Love’s fantabulous results in their office and ordered the Uzbek Suzani stencil from Royal Design Studio using the YHL coupon code.

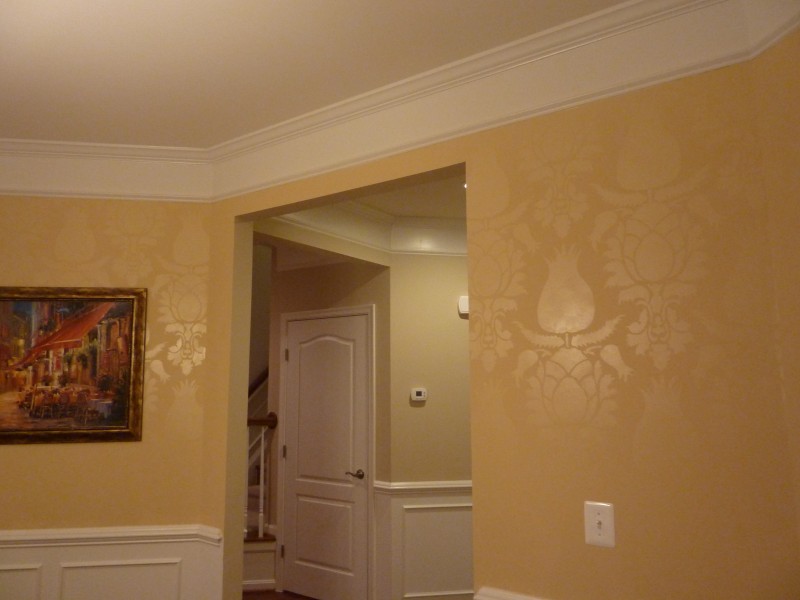
That’s a big step up from what the room looked like before, don’t you think? I was going for a tone on tone effect, didn’t really want it to stand out so much. My base finish was flat, so I picked a high gloss finish of the same paint color.
Materials
- Uzbek Suzani stencil from Royal Design Studio
- Martha Stewart stencil adhesive spray from Michaels
- Martha Stewart stencil sponge brushes again from Michaels
- Paint – Sherwin Williams August Moon in Gloss, the base was already the same color but in Flat
- Painter’s tape.
- Lots & lots of paper towels

How to Paint a Room with Stencil
#1. First, scuff off any marks/finger prints with a paper towel. I had painted the base coat almost a year ago so there were quite a few little hand prints/marks.

#2. You start at the center of a wall so the pattern ends evenly. I started off at the wall that is least obvious, so that any mistakes during the learning process won’t be easily noticeable. I used some painter’s tape to hold it, just in case. Actually I needed it only when I was keeping the stencil close to the ceiling.

This is how it looked like after I was done with the first one.

#3. Important lesson learned; always spray your adhesive to the back of the stencil while you lay it on your drop cloth. I did that but when I stuck it on the wall it felt like it was coming loose at the bottom. So I just lifted the back part (while the top stayed stuck) and sprayed on the adhesive. A big no no as you can see. Luckily that area will be covered by the painting we are going to hang there. Whew…just dodged a bullet. A light spraying of the adhesive is all you need. That can was more than enough for the entire room, still have 1/4th or so leftover.
#4. Dab the foam brush/ pouncer in the paint lightly so that it is coated evenly on all sides and center. Then dab it on another plate to take off any excess. We do not want to fully load the brush, will tell you why in a min. Hold the stencil with one hand to make sure that it is firmly in place and keep dabbing away on the wall GENTLY (key).

#5. Problem area 1: Sometimes I would get over enthusiastic and load my brush with more paint than needed or dab pretty hard and end up with this. The gloss finish of the paint added to the problem as well.

See those round brush marks? You need to go back and even those out other wise the gloss finish will just highlight it.
#6. Problem area 2: The corners. Man…these were painful. Squeeze the pattern as far into corner as possible (yes the design will be slightly off but it is ok) and then dab with you big brush to get the outline. Now go back into the corners with the small brush to fill in.

#7. Problem area 3: Mainly caused by my choice of pattern. The stencil had to be repeated in a staggering pattern. This meant that I had to match the outlines to the previuosly done part to make sure it lined up. Because I was using the same paint color (but diff finish) it was really hard to see the previously stenciled area.

This also meant that getting the stencil to stick for doing the part next to the ceiling was a pain in the … you know where.

Maybe because it was a humid day or it was the gloss finish, I had to wait a little bit for the paint to dry the first time. After that I alternated sides; once I finished the pattern on the left side of where I started I would go to the right side and then come back to the left. By doing so the paint was dry before I put the stencil against it to match the lines.
# 8. Another problem that I ran into was the paint caking on the stencil, again I think because of the gloss paint. As a result the edges were not coming out really crisp. Some elbow nail grease fixed that issue.

10hrs and counting, finally I was on the home stretch.

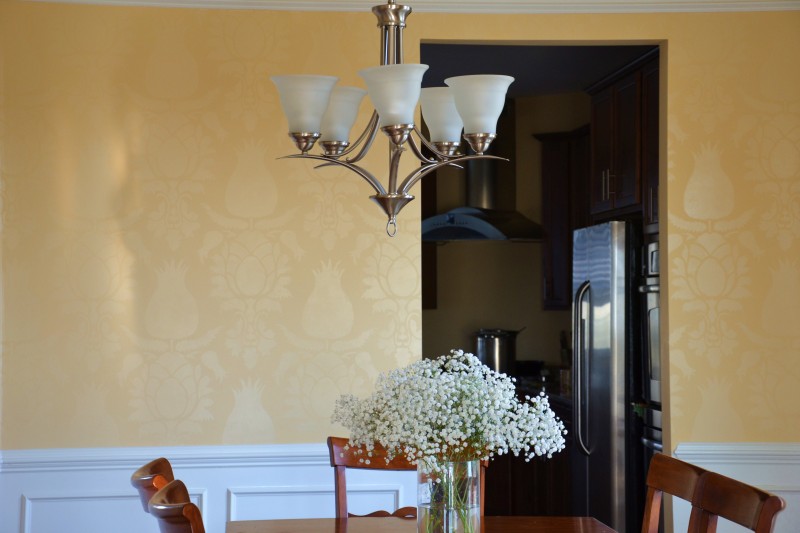
After 11 hrs (12hrs with an hr break in between) of back breaking, hand numbing hard work I was done. I started at 2.40 pm and was done at 2.38 am the next day! The paint color has a yellow undertone not the pink that you see in some of the pics (especially at night it somehow looks pink in the camera auto mode). Here is the finished room.

The stencil has a very subtle effect, like that of a layer of lace all over the room. It is like stencil art on my dining room walls! I looooove it!
The run down: Yes I was crazy enough to do it at a stretch. That is just me. I do not like to leave things midway and start all over again. Otherwise I wouldn’t have finished it. There were times that I felt that I had bitten off more than I could chew. Plus, that is what you do when you are working full time, handling the house and the kids and you are left with the only free weekend in the near future.
All said and done, would I do it again? Yes of course I would! But the next time I’ll make sure ;
- To choose the design a bit more wisely, no staggering patterns (not sure how that is going to work out).
- To choose a not so intricate pattern. Choose a pattern where I can use a roller instead of these small brushes.
- Will paint with a different color not the tone on tone effect.
- Will think double hard before I commit to doing the whole room.
Just a reminder, that cafe print is a place holder till we find a good one. You can clearly see the difference in the pic below. Both the living and dining have the same paint color, SW August Moon.
Is it worth the 11 hrs of hard work and 2 days of Mortin? Call me stencil-struck…..oh yes. 🙂
And there you have it my step by step tutorial on how to paint a room with stencil.
PS: You can see the final reveal here.


This is awesome. Kudos to you. Not just for the work, but for the pictures too.
Thanks Lekshmi.
Wow Girl!! It looks really awesome. Changed the whole look of the room …took it a few notches higher. I actually like the glossy pattern. Loved it. But I wouldn’t dream of doing it all alone.
Thanks so much Sunita.
Wow!!! great job 🙂 🙂 and those are some really great tips 🙂
I also hope to do this someday, lets hope that day comes soon
Thanks Purvi. Should try it sometime. It sure is a commitment in terms of effort but is well worth it.
I think you did a wonderful job!! it looks lovely, and goes well with the room. we just have to dive in sometimes and learn as we go. i have been stenciling for decades and i still get a smudge from time to time. the designs that are out there today are amazing. yes ,it is good to spray the adhesive while on a drop cloth. we have all been there :). i always wait a min. or 2 after i spary the adhesive allowing it to get tacky before applying it to the wall. the paint always builds up on the stencil no matter what type of paint, i keep a damp sponge near by to wipe the stencil with. and depending on how large the job is, i buy more than one stencil and that cuts my time in half. i am like you ,once i get started i stay with it until i finish…~Grace
Thanks so much Grace! Yes, it was worth all the hardship. 🙂 This stencil was on the $$ expensive side, so getting more that one was out of question. Anyway I have plans to stencil our guest bedroom too later in the yr. Let us see how that goes. I would love to get some tips from you on furniture refinishing. Love all the work you do. We have been toying with the idea, may be will start with a couple of chairs.
Beautiful, Vidya!!!…I had been planning to do an accent wall in our bedroom using a similar wallpaper (no stenciling..no patience for that I guess)
Thanks Preetha. Doing one wall is much easier. It will take may be 4hrs. Let me know how it goes.
11 hours in a stretch ? That shouldve been one back breaking effort… But looks so much worth it. We have been wanting to do a feature wall as a DIY and are looking for options… Thought we would go for a plain color. But this post is quite inspiring… Do you get these stencils in India ? I may have to do some bit of research.
Thank You! Yes it was tough, more hand and leg breaking. 🙂
Oh my gosh.. thats simply amazing.. Well done.. You’ve done a marvellous job.. truly!!
Fab Job… !!! Love the stencil that you have chosen and the glossy color too… !!
But, Guess I would never try this at home… 😉 😉 ….. !!
Thanks Emreen. Did you mean, you can’t try as they are not available in India? I just found these from Google. May be you want to try some of these places. Looks like the first one is in Chennai.
http://trade.indiamart.com/details.mp?offer=2066326533
http://www.dressyourhome.in/tag/stenciling/
http://www.paintrollersindia.com/painting-stencil.htm
You did a beautiful job! Wow!
Thanks so much for stopping by. I’ve done a lot of stenciling (even floors!) and it’s such a great inexpensive DIY idea, isn’t it?
Thanks so much for sharing yours with me. 😉
Thanks so much Roeshel. Just finished your farm house tour. Totally in awe.
Came over here from YHL… you did a great job! It does NOT look easy, but it looks terrific!
Thanks so much Leslie. Yes it was tough work, 11 hrs non stop. But well worth it. I am planning to do another one in my guest bedroom, maybe only an accent wall this time. 🙂
wow, that turned out really, really nice!!! I love the subtle effect. I had pinned something like this before, and I love seeing someone do it with a different color and pattern. I’m glad there are people with the patience to do these projects!
Thanks Teresa. Yes, I wanted something subtle too as the room is open to the living room painted in the same color. Wanted the rooms to have their own identity yet have the same flow. Totally digging your spray painted lamp project. I have pinned something similar to my to do list too.
Looks so good!! Do you think it would be feasible to get that affect with some type of gloss spray instead? Just wondering if it would cut time to just spray a clear gloss spray paint.. not sure if it would work though.
I’m so glad that you like it. Yes, I think you can get the same effect with glossy spray paint. I have seen a lot of these stencils with metallic paint on them. Royal Studios had this stencil originally painted with a base coat of metallic paint stenciled with a flat. But not sure how practical spray painting an entire room would be. For a small space definitely go with the spray. A clear gloss might be a bit too subtle. May be test it on something else before actually doing it on the wall? If you are planning to do an entire wall, then I would go with small rollers, will cut down the time for sure. That is what I’m going to do next time.
My wife and I do all the work on our house. But never thought of a stencil painting. This is really great. It really makes the room look rich.
Thanks for all the steps and tips, hope to do this some day.
Excellent work
Thank you. Glad you like it. Would be great if you could share some of your DIY with us.
Vidya
wow i like it too…very nice work…. am trying stencil on wall too… but slightly diffrent kind…
Thanks again. Looking forward to seeing yours.
Vidya
Hi, I’m visiting via YHL!
Just an amazing job…I really appreciate the subtetly of the design and the amount of effort you went through!
Aa’s Mom,
Thanks for visiting. Glad you liked it.
Vidya
Hello,
I love what you have done. I am a complete novice but want to give this two tone stencil painting a try. I understand you used a flat paint and gloss paint of same tone. But which do you paint first? Do you do the stencil with gloss and then paint over it with flat? I couldn’t quite make out from the pictures.
Thank you! I painted the flat first and then stenciled over with the gloss. You can do either way depending upon the effect you want. I did not want too much gloss as it reflects a lot of light. That is why I went with flat base there by keeping the gloss to a minimum. You should give a it a try. I just finished another stenciling project, will post about it soon. Don’t forget to enter for our awesome stencil giveaway later this month!
Vidya
Hi,
Where is the link for you stencil giveaway? Could not find it.
Not yet, coming up later this month, the last week of August.
It looks brilliant! Since you had some troubles with the gloss paint, you could try different shades of the same color. If you have a good decorator paint store nearby–we’ve got a great retailer of C2 Paints in town–you can choose a color and ask for an 100 % concentration of the color for the wall and a different concentration for the stencil paint. It would be subtle as well. So you could do 100% on the wall and 50% of the same shade on the stencil. I used this in a few rooms–I did 25% on the ceiling, 50% on the walls and 100% on the trim. I didn’t want a sharp contrast with trim or a white ceiling.
Thank you Madge. That is a great tip. I had never thought of that. Will surely try it next time.
Vidya
I think it looks fabulous… I just did my bedroom in a large floral damask.. I was just wondering, why you didn’t use a foam roller??? It would have cut your time in 1/2, from all the research I have done, looks like the way to go when your doing a big pattern and space. I am doing my dining room the same way.. but a circle design.. thanks for the great idea.
Thanks Barb. I think for stencils with a lot of details foam roller doesn’t work, at least for me. Maybe I’m not doing it right. I tried it with my second project and the roller part didn’t look very good.
https://www.whatsurhomestory.com/im-at-it-again/
Do let me know how yours goes? Would love to see ‘after’ pics.
Vidya
Hi Vidya.. I am doing my dining room tomorrow, and scared lol, I didn’t buy high gloss, I bought semi gloss.. aaakk… I am also going to go over it with a stencil brush, with a little silver… I will let you know how it turns out… I think I did send you pics to your e mail… Hope all is awesome with your new projects.
Wow. Good luck Barb. Can’t wait to see how it looks. Yes I did get the pics. Just realized I haven’t replied. Got caught up in a lot of stuff. Do keep me posted.
Vidya
I just finished my wall… Yikes that was alot of work… as I had to paint with the grey semi gloss.. and then wait for it to dry, then go over it with a stencil brush with silver…. It turned out great, just gotta get a bigger blingy mirror up.. the picture I had there, made the wall look old ladyish lol.. I will send you a pic.
Looks fab!
I still love your wall…. I am doing a friends nail salon wall tomorrow.. 35 ft wall… WHAT was I thinking lol… We are doing the same Damask as my bedroom, and she wants the two tone look, but on a white wall….finally I think we found the perfect blend of white, silver and pearl… I will let you know how it goes… it’s going to be a long day lol.
That sounds awesome. I know you’ll rock it Barb. Do share the after pics.
Vidya
Wow! I love the look. It turned out great. I don’t know if I would have chosen that pattern at first, but now that I see the finished results, it is beautiful. The wall color looks close to the color of my recently purchased home. All the walls were painted antique white. Not a bad color, just not the color for the entire house. But because the paint job is new, hubby suggested that we hold off on painting (I am sure that is not the only reason-after all, it is football season). But this would be a good alternative to give the walls some life. I love it!
Yes, Shone. Stenciling is an easy solution if you do not want to repaint the walls. Do let me know how it goes and maybe some after pics?
V
I just came across your post about using flat and gloss paints of the same color. I’ve been wanting to do this in my master bedroom (on just one accent wall thank goodness). My only hesitation is that I’ve already purchased my stencil, and the part that I want “glossed” will have to be the base coat. I’m a little concerned about trying to paint a flat paint over a gloss paint. Have you ever tried this? Thanks so much for any help/info.
Hmmm…..gloss as the base might be tough to paint over. Is your stencil pattern intricate? I’ve tried painting over semi gloss with flat in my previous home and that was hell. Took so many coats and finish was uneven. Maybe you could get a sample pot and do a trial in a closet or a place that is not so obvious? That way you would get a sense of how hard it is. If it is a tone on tone paint job with flat and gloss I don’t think it will make a difference if gloss is the base coat or not. If it is 2 different paint colors that you plan to use then that is a diff story. In that case I would definitely do a small patch trial run.
Hope that helps. Andrea, do let me know what you decide and how it turned out. Would love to see the final wall.
Vidya
Thanks so much for your reply, Vidya. I think I’ll do a couple of test runs like you suggested. First, I’m going to try switching my layers and paint the base coat flat and stencil over in gloss. It’s not what I wanted originally, but I’ll see how it turns out before I decide. BTW, I’m am going for a tone-on-tone look. Thanks so much for your help.
wow gorgeous!! Labour of love indeed!
Thank you Madhu.
Wow, It looks beautiful! I,m curious if you have had any problems with the spray adhesive leaving a residue on the walls? (other than the small area you already mentioned) I have been leery of it. When I used it before I had to make a box open on one side to spray the paint in and not get overspray on the surrounding area. if it does get on stuff it is hard to remove. Maybe I need to use the right kind? Please let me know if you have had any residue problems. If you haven’t, I will feel more confident using it again. Thanks!
So pretty! I totally understand the doing it in a stretch! I’m the same way. Let me share with you a few tricks I’ve learned from numerous stenciling projects. I love the tone on tone look but gloss paint, as you found out is tough to work with. You can get Annie Sloan Pearl and add it to your original color and get a beautiful tone on tone. Plus its water based so really easy to clean and wash of stencil. It dries super fast too! I plan on doing several projects in the house we are building with this very finish!