DIYs, Recipes, Furniture, Art - Whatsurhomestory

Your family's story through your home

  • Home
  • My Story
    • Contact
  • Our Home
  • Tutorials
    • DIY & Crafts
    • Furniture Makeovers
    • Sewing
    • Gardening
    • Room Makeovers
    • Home Tours
  • Holiday/Seasonal
    • Christmas
    • Winter
    • Spring
    • Summer
    • Halloween
    • Fall / Thanksgiving
    • Parties
    • Indian Holidays
  • Recipes
  • Advertise
    • Privacy Policy
    • Features

DIY Cork Coasters

April 4, 2013 By Vidya 30 Comments

Strangely enough we’ve never had coasters at home. Now that I think of it, I’m drawing a blank on why we never thought those were necessary. Anyways lately the lack of coasters has become an issue especially for B, when he wants to put down his hot cup of tea on the coffee table. My solution…..

DIY Cork Coasters

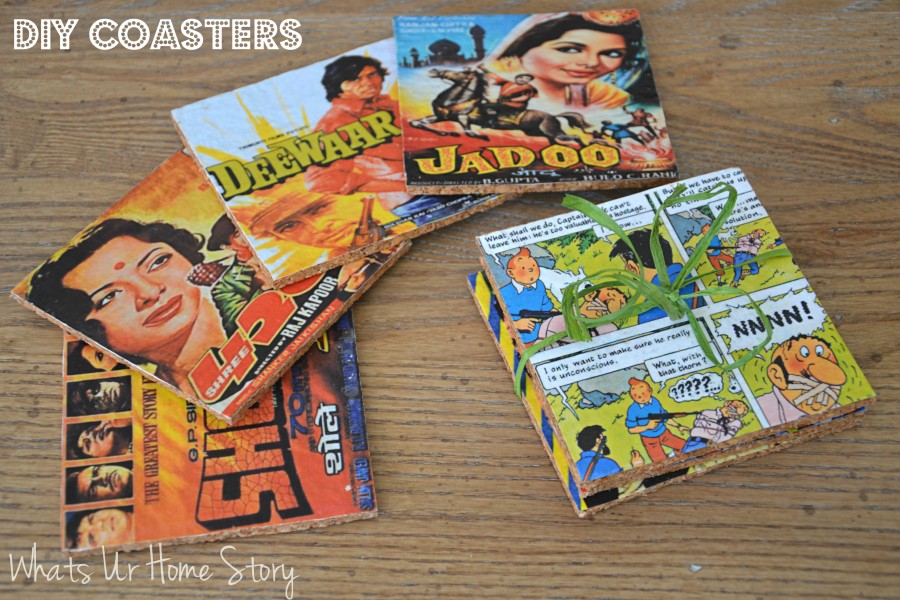
Cork coasters made with vintage Bollywood movie poster and comic book cover/ page prints. And totally free as I had everything on hand! If you were to buy all the supplies from scratch then I doubt it would cost you more that $10 for a set of 8.

Supplies

Cork board or pre-made cork coasters (available at craft stores) – I used the tiles that I had left over from my cork board map project.
Mod Podge Gloss – Micheals -You can use matte finish Mod Podge for gluing the print to the cork but for the sealing layer you need the Gloss
Movie Poster/ comic print – You could use anything you want, prints of your kid’s drawings, wrapping paper etc.
Xacto knife
Sponge brush
A hard surface to work on
 DIY Cork Coasters

The Process

  • Secure your print to the cork board square with painters tape and cut along the edge.
  • Add a layer of Mod Podge (Matte or Gloss) to the cork and stick the print.
  • Make sure to smooth out any air bubbles with a credit card. When you do this always start from the center and go towards the edge.

DIY Cork Coasters

  • Once it is dry coat the print and the sides (important) with Gloss finish Mod Podge. Trust me, I tried the Matte finish. It looked pretty dull. The Gloss brings out the colors in the picture and gives it a professional look.
  • Repeat if necessary. I applied 2 layers of Mod Podge to be on the safe side.

Love how they turned out. Won’t they make great hostess or teachers gifts?

DIY Cork Coasters

For the prints I just picked colorful ones after searching the net, played around a little bit (upping the contrast and sharpness) in Pixlr and re-sized all the pics to the same (4 x 4) size. Then I made a collage with the 4 pics and printed it out.

DIY Cork Coasters

It is that easy! Took me half an hour to make a set of 4.

DIY Cork Coasters

Just a note, for the first few times of use these might stick to the cup when you place a really hot cup of tea or coffee on it. After a few uses this problem goes away (I think) because the Mod Podge layer gets used to the warm temps.

DIY Cork Coasters

You could make these with ceramic tiles or scrap wood too.

Have you DIY’d coasters?

Linking to;

Project Inspired Linky Party #8 @ Setting for Four

← Craigslist Adventure Inspiring Spaces – Laundry Rooms →
« Craigslist Adventure
Inspiring Spaces – Laundry Rooms »

Comments

  1. Anu says

    April 4, 2013 at 7:52 am

    Love the idea, Vidya. Of course…me being myself thought that these were old CD’s…LOL!!! Very innovative….I really want to try this out!

    Reply
    • whatsurhomestory says

      April 4, 2013 at 9:54 pm

      LOL! Thanks Anu.

      Reply
      • Donna says

        June 6, 2020 at 12:00 pm

        Are these washable afterwards?

        Reply
        • Vidya says

          June 7, 2020 at 10:16 pm

          Yes, you can wipe any spills off of them.

          Reply
  2. Shruthis says

    April 4, 2013 at 9:28 am

    I made them too couple of weeks back…I used vintage movie posters (english/hindi), few of Doddles and few of my paintings 🙂

    Reply
    • whatsurhomestory says

      April 4, 2013 at 9:55 pm

      Wow! That’s awesome. Great minds think alike!

      V

      Reply
  3. Palak says

    April 4, 2013 at 4:44 pm

    aaah!!!! These are so cute– My husband would love it!

    Reply
    • whatsurhomestory says

      April 4, 2013 at 9:55 pm

      🙂

      Reply
  4. Sreekala says

    April 4, 2013 at 9:21 pm

    Nice idea Vidya… Waiting for more such innovative ideas…

    Reply
    • whatsurhomestory says

      April 4, 2013 at 9:55 pm

      Thanks Sreekala.

      Reply
  5. Shannon -MadiganMade (@madiganmade) says

    April 5, 2013 at 7:20 pm

    I love these! Fun, colorful and easy (and using Mod Podge, one of my fav craft supplies!)
    Thanks so much for sharing this week at Project Inspire{d}!

    Reply
    • whatsurhomestory says

      April 9, 2013 at 10:29 pm

      Thank you Shanon.

      Reply
  6. rebeccasdelightfulhome says

    May 1, 2013 at 10:34 am

    Super cute! Great gift idea too!

    Reply
    • whatsurhomestory says

      May 2, 2013 at 2:33 pm

      Thank you!

      Reply
  7. Sujatha says

    October 28, 2013 at 4:59 am

    Hey Vidya! Just came by your blog and I love these coasters and your DIY ideas as well. Do check out the rustic rope coasters on my blog and let me know what you think…

    Reply
    • whatsurhomestory says

      October 28, 2013 at 10:48 am

      Thanks for dropping by Sujatha. That’s a very clever way to use rope for coasters. Would have never thought of that. How do you clean them if there is a spill?

      Vidya

      Reply
      • Sujatha says

        October 28, 2013 at 11:53 am

        You would have to stand it and tap gently till the liquid drips out and work it with a hard bristle brush. Ideally though i would’ve liked to thread a needle through the rope and not use the transparency but this rope wouldn’t give !
        Broke a needle trying..
        Sujatha

        Reply
  8. Nicole @ Mendez Manor says

    October 28, 2013 at 11:44 am

    Oh these are super cute! My pumpkins and your coasters should definitely get together! LOL! Have a great week!

    Reply
  9. Carol Ann says

    January 29, 2014 at 10:47 am

    Consider trying different wrapping papers for different Season or Holiday coasters.

    Reply
    • Vidya Sukumaran says

      January 29, 2014 at 11:03 am

      Yup, sounds like a plan.

      Reply
  10. Leslie says

    May 27, 2021 at 11:55 am

    does the paper start to come off after water moisture ?

    Reply
    • Vidya says

      June 21, 2021 at 12:20 am

      After 5/6 years it did on some. But the mod podge did a good job.

      Reply
  11. Rocky says

    January 23, 2024 at 3:54 pm

    Question: when printing photos do you use photo paper to attach to the cork or will card stock work?

    Reply
    • Vidya says

      February 6, 2024 at 9:52 am

      I just used regular printer paper.

      Reply

Trackbacks

  1. DIY Cork Coasters | The Adored Home says:
    May 1, 2013 at 9:08 am

    […] I not only love the name of her blog but she has some really great ideas! She tells step by step how it only took her half an hour to make four coasters! She even uses some other prints to make some really great coasters. Check out how she did it here! […]

    Reply
  2. 37 Functional Crafts Of Cork says:
    July 31, 2013 at 8:39 am

    […] decorated cork coasters (via whatsurhomestory) […]

    Reply
  3. DIY Cork Coasters The Adored Home | The Adored Home says:
    August 18, 2013 at 2:00 pm

    […] I not only love the name of her blog but she has some really great ideas! She tells step by step how it only took her half an hour to make four coasters! She even uses some other prints to make some really great coasters. Check out how she did it here! […]

    Reply
  4. DIY Cork Coasters | Southeast Valley Artisans Guild says:
    January 28, 2014 at 6:08 pm

    […] Pin It […]

    Reply
  5. DIY Cork Coasters | Welcome to The Adored Home says:
    March 31, 2015 at 8:30 am

    […] I not only love the name of her blog but she has some really great ideas! She tells step by step how it only took her half an hour to make four coasters! She even uses some other prints to make some really great coasters. Check out how she did it here! […]

    Reply
  6. Beautifully Rainy day | Sew Nerdy says:
    November 2, 2015 at 8:58 pm

    […] As long as I’m keepin it nerdy, I’ll have to post mine when I make these comic book coasters from What’s Ur Home Story. You could use album covers, sheet music, […]

    Reply

Leave a Reply Cancel reply

Your email address will not be published. Required fields are marked *

Hi! I'm Vidya, an IT professional by day, a mom to my 2 darling monkeys, a wife, a home maker, an avid gardener and home decor/ DIY enthusiast round the clock, and a blogger in my free time. Read More…

  • Facebook
  • Instagram
  • Pinterest
  • Twitter
  • YouTube
subscribe img

Categories

Love this outdoor space with a beautiful red and blue outdoor decor with a flamingo pillow, metal tray side table, and loads of green plants

Finally the long overdue post, our new screened in porch reveal. This space has undoubtedly become our favorite room in the house now. To tell you the truth, I was against the idea of ripping apart our good size deck and replacing it with a screened in porch but B insisted that this was the…

Read More »

Archives

Features

Features

Networks

POPSUGAR Select Homemarthabadge1
  • Facebook
  • Instagram
  • Pinterest
  • Twitter
  • YouTube

HOME | MY STORY | OUR HOME | TUTORIALS | HOLIDAY/ SEASONAL | RECIPES | TIPS & TRICKS | ADVERTISE | PRIVACY POLICY | FEATURES | SITEMAP
DIY, Crafts, Recipes, Gardening – Whatsurhomestory.com COPYRIGHT © 2020 WHATS UR HOME STORY

Like What You See? Subscribe to Receive WUHS Posts via Email!
Your information will *never* be shared or sold to a 3rd party.